Are you having trouble accessing your private DNS server? Are you getting an error message that says “Private DNS server cannot be accessed“? when you are trying to connect your phone to WiFi.
Don’t worry, you’re not alone. Many people are experiencing this problem right now. Private DNS servers are a great way to keep your data and information secure, but if they are not working correctly, it can be a real headache.
In this article, we will show you how to fix the Private DNS Server Cannot be accessed error. We will also provide a few workarounds that might help until the problem is fixed.
Fixing “Private DNS server cannot be accessed”
Troubleshooting internet connection issues on Android phones can sometimes be challenging, particularly when connecting to Wi-Fi networks.
When connecting to a Wi-Fi network on your Android phone, you may see the Private DNS server cannot be the accessible message.
Usually, the problem will resolve itself within a few minutes, but in most cases, it will take hours or never resolve at all. So here are the 2 methods that you can apply to solve this issue.
Method 1
If your phone is not connecting to a public Wi-Fi network, a school Wi-Fi network, or your home Wi-Fi network, it could be due to your phone’s DNS server settings. So let’s correct it.
- On your phone, go to the settings.
- Next, tap on Network and internet settings,

- Scroll down and tap on more connection settings.

- You will see an option called “Private DNS” Click on it.
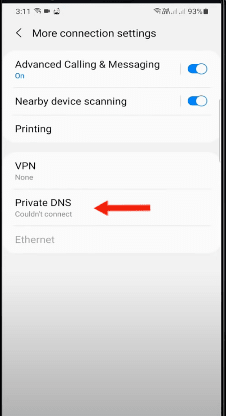
- A small window will pop up. In that window, choose the Automatic or Off option.
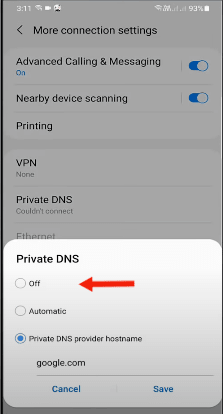
- Next, click on the Save option to save your settings.
- Now just restart your phone and now you should be able to connect to the Wi-Fi network.
Here is the video walkthrough of the same method mentioned above. In most cases, after changing this setting, your wifi will be up and running.
Method two
If you have added the private DNS provider hostname and want to continue using it, use the techniques listed below. It will resolve the private DNS problem on your Android device.
All you need to do is change the existing DNS provider to another provider if you’ve added a Private DNS provider hostname. For example, if you use Cloudflare, change it to Google. Here is how to do it.
Depending on your phone model, it can be a bit different.
- Open your phone and go into your wifi settings
- Long click on the wifi you are connected to and select Modify network.
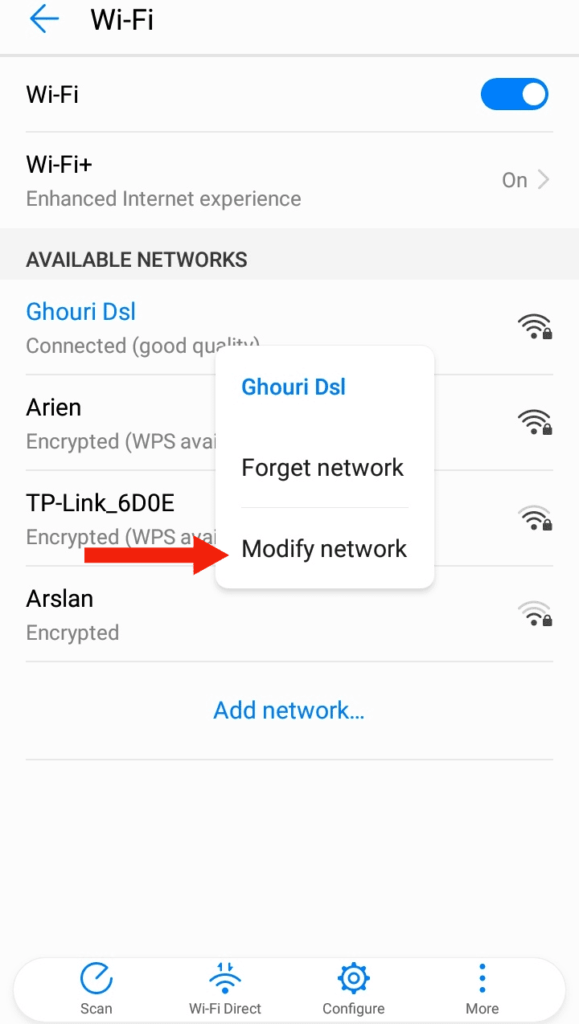
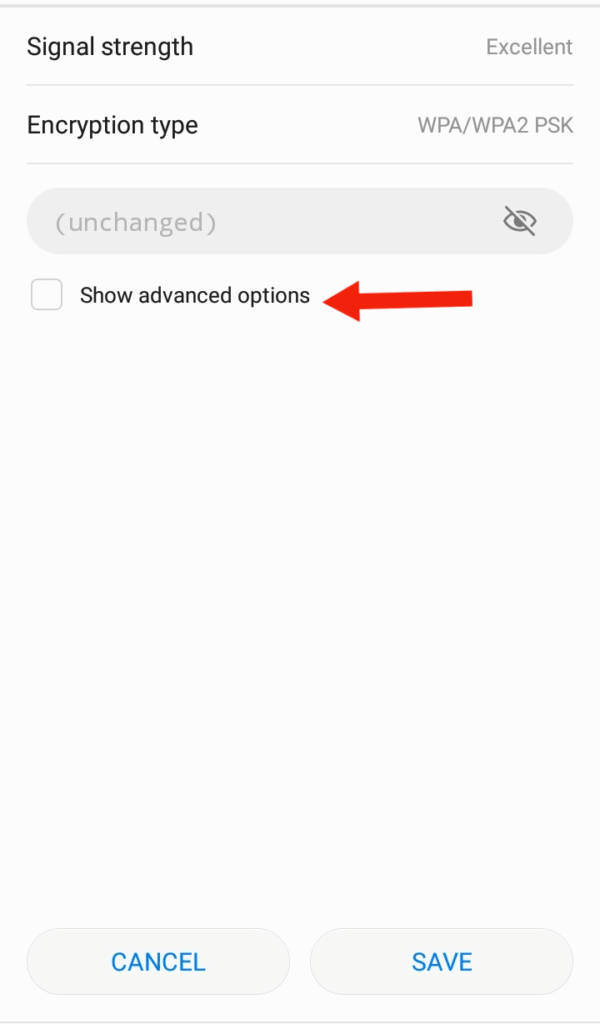
- Click on “Show advanced options.”
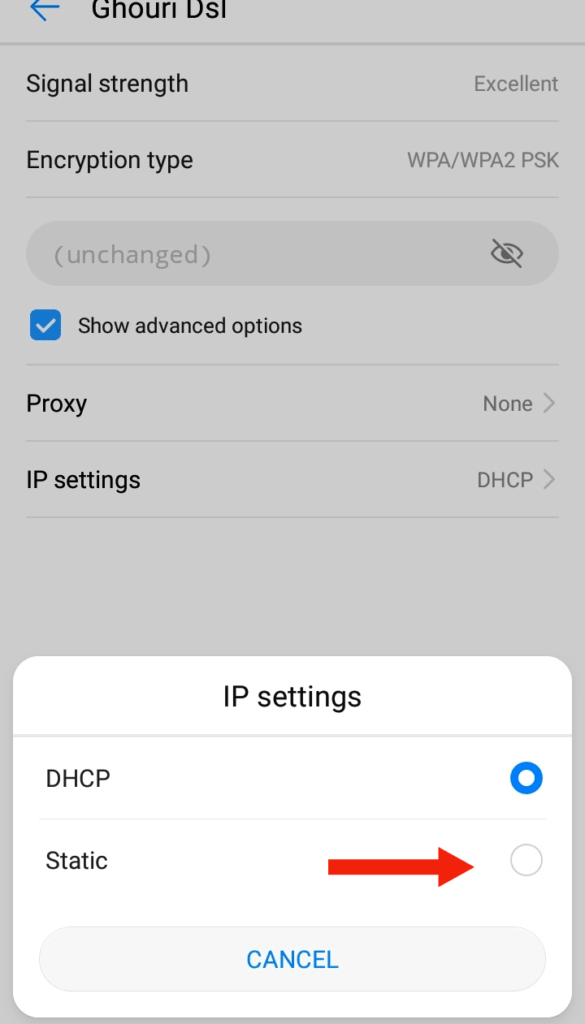
- Change the IP setting from DHCP to Static.
- Now just change the DNS servers
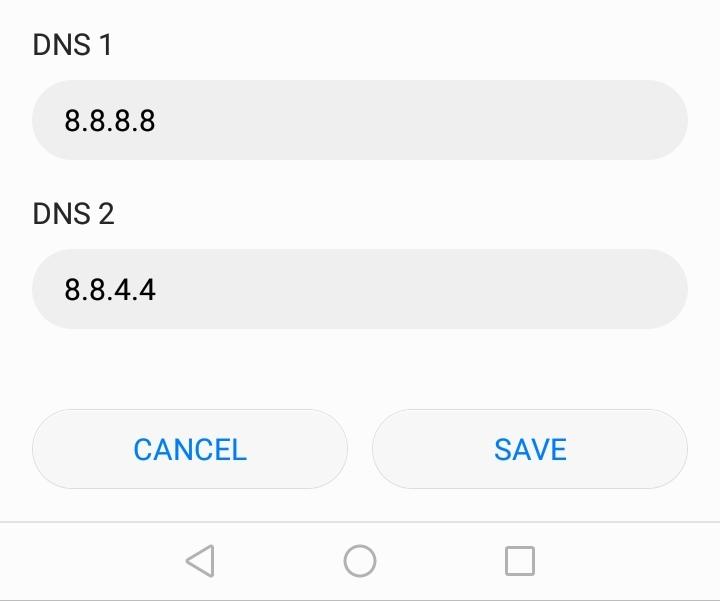
- You can change it on the Google DNS servers (8.8.8.8 and 8.8.4.4) or you can try Cloudflare(1.1.1.1 and 1.0.0.1). Check if this fixes the issue.
Another cause of the “Private DNS Server cannot be accessed” message could be that your router and phone are utilizing separate DNS servers.
If you’ve added a DNS server to your router, either add the same DNS servers to your router and phone or select the Automatic option from the first method above.
Relation questions
What does “private DNS” mean?
A Private DNS’s meaning is buried in its name; private. They are DNS networks distinct from the public DNS.
It is a feature that has been available since Android 9.0 Pie in 2018, allowing the operating system to route all DNS queries to a custom DNS server while encrypting the queries over TLS (DNS over TLS/DoT) to prevent hijacking, snooping, or phishing attacks.
Best private DNS servers?
Here are the top DNS servers:
- Quad9
- OpenDNS Home
- Cloudflare
- CleanBrowsing
- Alternate DNS
- AdGuard DNS
How to setup a private DNS server
Here is how you can set up a Private DNS server:
- On your phone, go to the settings.
- Next, tap on Network and internet settings, scroll down and tap on more connection settings.
- You will see an option called “Private DNS” click on it
- A small window will pop up.
- Select Private DNS provider hostname For example “dns.google”
- Click save
Should I enable private DNS?
Yes, you should enable private DNS. Because it is a great way to improve your security and privacy while using the internet.
Private DNS servers encrypt your traffic and can help prevent snooping. It can also protect you and your devices from malicious actors on the internet.
Private DNS vs VPN
A Private DNS is a great way to improve your security and privacy while using the internet. Private DNS servers encrypt your traffic and can help prevent snooping.
A VPN is also a great way to improve your security and privacy while using the internet. Both of these services are useful for unblocking geo-restricted websites and streaming material from other countries.
Only a VPN, however, will conceal your IP address and encrypt your web activity. Custom DNS will not fake your location or encrypt your data, but it will help you improve your internet performance and security.
Conclusion
I hope you found this article helpful. In theory in most to fix the “Private DNS Server cannot be accessed” error, all you need to do is to change some DNS settings.
Or you can also try changing your DNS server to another provider if you’ve added a Private DNS provider hostname.
